


The Prop Life: Managing Risk
Special Episode: Chapter Three


In this third chapter of trading from prop accounts (here are links to chapters one and two) we begin to look at how we manage risk. I remember being a new trader and not quite understanding the all-encompassing phrase of “manage your own risk”. It is a huge topic, made up of many different aspects that you learn along the way. But as a prop trader, managing risk means something very specific, so in today’s episode will be taking a deep dive into the three most important aspects:
Getting the right position sizing in your Apex Account
Stop Losses and Profit Takers
Managing Maximum Account Value Drawdown
There are many more elements I could add to the list, such as how you can reduce risk through your entry and execution. Much of that part of risk management is covered here.
Before we get to it, reminder that Apex currently have an 80% lifetime sale. Use code SAVE80 at checkout!
So that being said, let’s get stuck in:
Position Sizing
Getting your position sizing right is crucial if you are going to be successful. If your position sizing means you can pass or fail your Apex evaluation in less than five trades then I can tell you now that your risk is way too high. To illustrate this, let us look at the 100k full account:
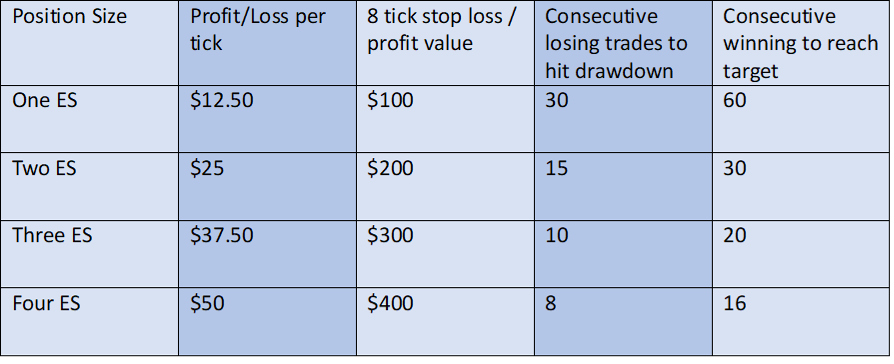
The above example uses a 1:1 risk/reward (RR) that is to say, the stop loss is 8 ticks and the target is 8 ticks. Now, let’s say we choose the safest option to trade, which is 1 ES. But we choose to trade 10MES as the equivalent. What if we set 5MES to a target of 8 ticks and the rest to a target of 16 ticks. How does this change our goal if our stop remains the same (8 ticks for all 10MES)?

Look at how we have kept our risk exactly the same at 30 but our reward has increased by over 30% meaning we now need less successful trades to hit our target.
So the moral of the story here boys and girls is this: Slow & Steady wins the race. The amount of contracts you trade is your position size, your position size needs to mean that it is hard to both pass and fail quickly. In both cases, it should be slow and steady.
Bracket Orders
I think the above example doesn’t just give you a great idea of why position sizing matters but it also highlights the needs for a very clear and consistent bracket style. This is why it is important to understand “full” and “partial” trades. A full trade is one where you let price go all the way down and stop you out at your stop loss, this would be a “full loss” and full win would be price hitting all your profit targets, this would be a “full win”. Similarly, where you decide to flatten before the stop loss is reached is a “partial loss” and where you flatten before all targets are reached is a “partial win”. You can see based on this, that the tables I used above are only accounting for full trades and does not consider partial.
The goal of bracket based trades is for you to be able to reduce your risk by having a predefined strategy. I want to be clear at this stage, brackets will only work for you if you are able to be patient and wait for good entries, if you take a shit entry you will find yourself itching to move your stop loss or targets. This is a sign that your entry was poor. There is more detail about this here.
The most important thing to consider about brackets is making sure you are constantly trailing your stoploss up (I do this manually). Thereby, reducing your risk consistently the longer your trade is active. The importance of not taking a full loss too many times is clearer when you consider that not every trade you make will hit all your profit targets. You might have a day where only target 1 is hit consistently. So the question you have to ask is how many target 1s do I have to hit in order to make up for a full loss.
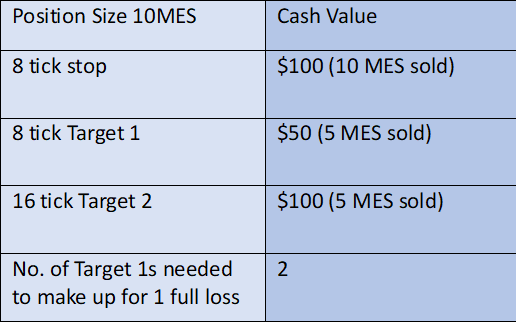
This is illustrated really well here. For every full losss you take, you need to hit two T1s in order to make that money back. Essentially you need a 2:1 success ratio. This is why we trail our stop manually upwards as the move begins to go in our direction, we want as few full losses as possible. Remember folks, nobody ever went broke taking profits!
Maximum Account Value Drawdown
The way in which Apex handles your drawdown is a great way to become a consistent trader. If I had not found prop accounts, I don’t know if I ever would have understood the need to manage risk in the way I do now. Let’s imagine there are two traders making their first trade on a newly opened 100k Apex account. We will call them traders A and B, who are in a trade that is up 20 points.
Trader A has a 10 MES position size where as trader B has a 4 ES position size:

Now, lets say the market immediately turned against both these traders and they lose half their gains.
Which trader has more to be worried about? The drawdown is much higher for Trader B, if both traders now take a full loss on his next trade then their drawdown looks like this:

It is clear to see here that Trader B is in trouble, he now has 5 losing trades left until his account is failed. Trader A on the otherhand has 28 trades left. Even though both these idiots gave away half their gains!
Moral of the story here folks is simple, your position sizing and your brackets are the life line for your drawdown to remain healthy. If they are toxic, so is every trade you make!
As we head into another week of trading, I hope you will spend some time understanding what position size and Apex account size works best for you. Once you understand this, I hope it will slowly but surely begin to work in your favour.
Much love,
PW
What Is Apex Prop Trading?
Don’t risk your own money until you are a consistent trader. Use Apex instead. I found my consistency using them. I wrote about it in detail here.
Click here to find out more and get a 80% lifetime discount with code SAVE80
What are Walnut Footprints & Sierra Chart?
I explain how to read my footprint chart here. You can download and use it for free!
I wrote a detailed breakdown of how to sign up for a 14 day free trial of Sierra here.
How Do I Get Into The Walnut Discord?
I want to grow our discord communities (clubs) so that they are self sufficient and a place of safety for newcomers. To do this we operate under a slow-growth policy, but to be added to the waiting list click here.