User Guide Chapter 2: Walnut Levels
Entries & Exits
In the last chapter we spoke about the need to understand price action. We covered some great examples of how you can go long and short on a Walnut Level and just how well our lines interact with price.
Today, we break down this in to more detail:
Where do we enter a trade?
Where do we put our stop loss?
What should our targets be?
I have five rules that I follow in taking an entry and making an exit. Let’s explore them:
How low will they go?
The fundamental principle I use in my trading is knowing that a “liquidity grab” is a big part of the price action. When we see price cool down, often bigger players will force price even lower in order to get their fills before moving it higher. What does this look like on our charts?
Let’s study an example of a small liquidity grab, and see what we can learn:
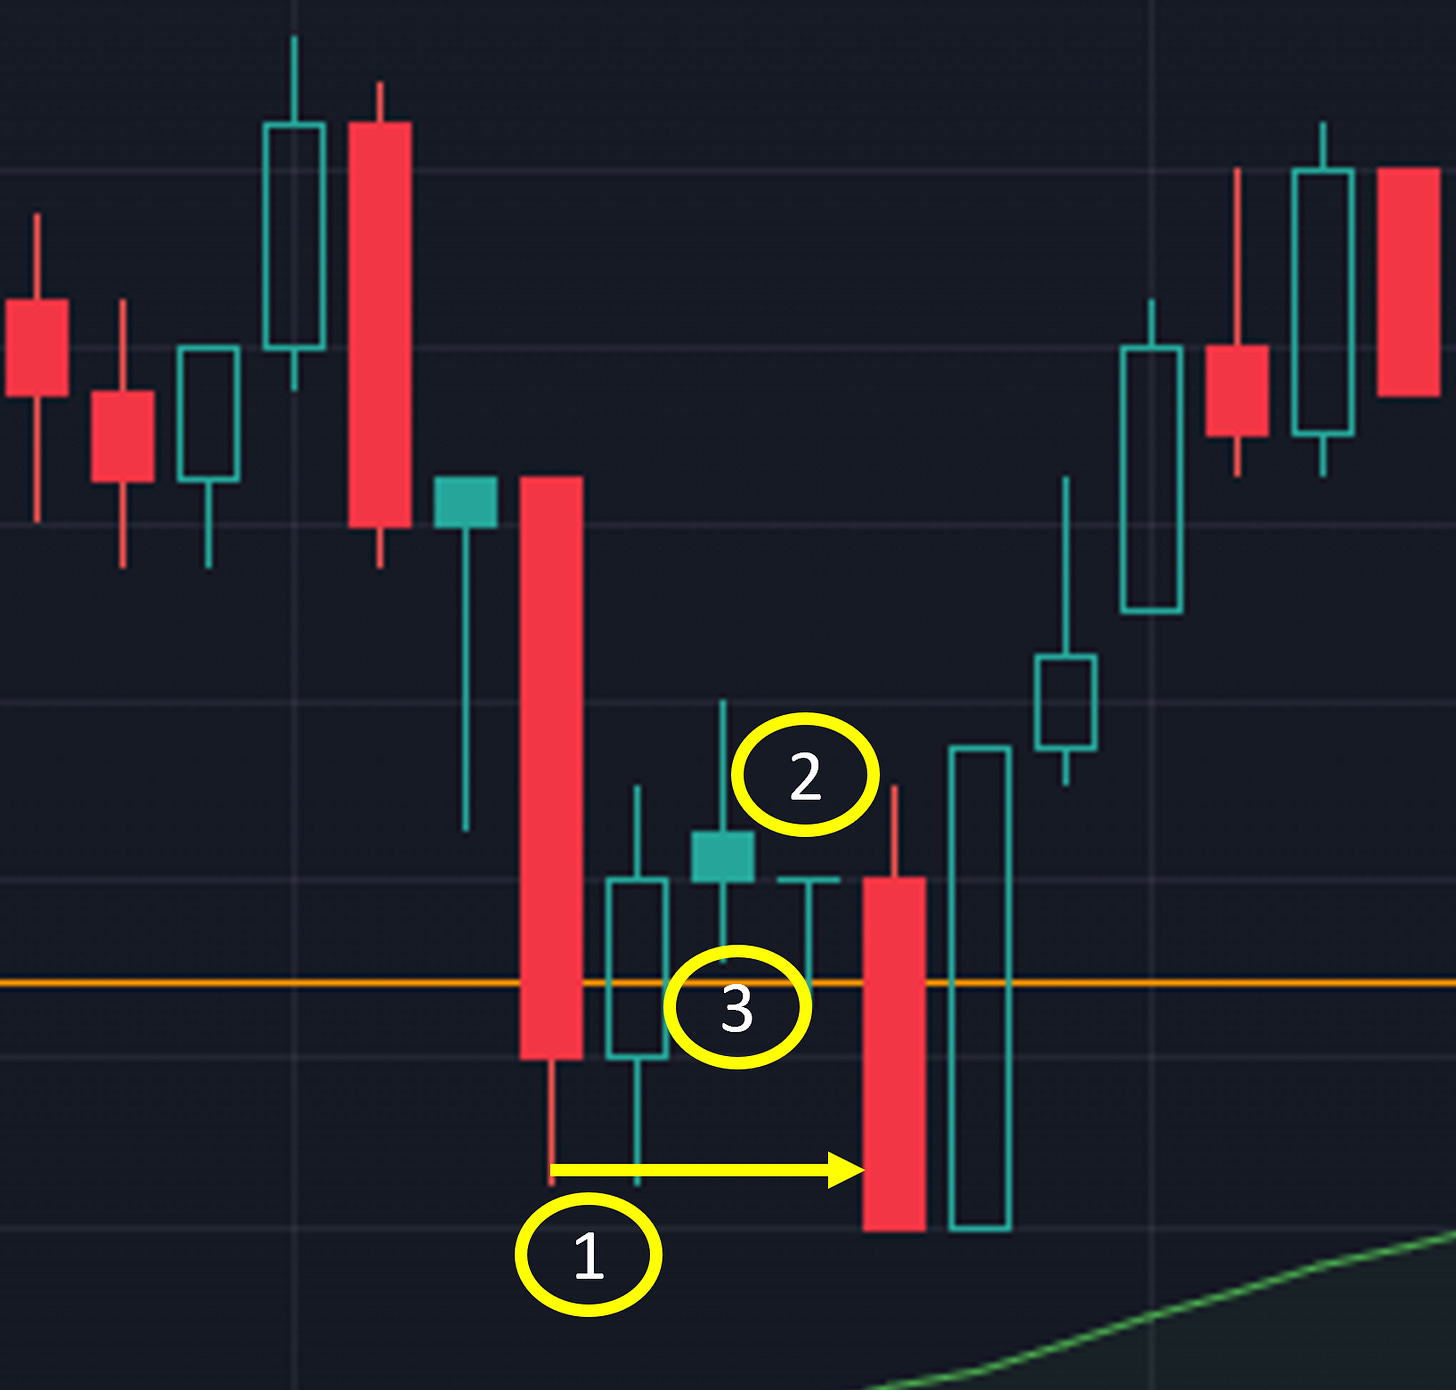
The above setup is one of my favourites! Price has broken out above the orange line which is a key walnut level (1). After it breaks out, it cools down and retests the line (2). This is what a healthy breakout should always do.
Notice the lower ends of (2) where the wicks are identical → that is our retest.
Now after that big red bar at (2) we see the next few bars begin to reclaim the line. and then we get another big red bar at (3) followed by a large bullish bar.
What happened here? Well, if you look closely you will see the low of (3) is below the low of (2). Large players in the market took price below the previous retest low - triggering lots of stop losses - they bought many more contracts from those triggers and then allowed price to breakout to (4).
So how do we play these setups? The answer is simple(ish). But let’s break it down into steps we need to consider.
A) Our first job is to identify the larger time frame trend this move is in. If we are going long, this MUST be a higher low for us to play it. So let’s zoom out and see:
We can see that in the above picture price made a previous low at (1). Our current setup is (2) so the answer to our first question “Is this is a higher low?” is yes.
Rule 1: Only long on a higher low.
Let’s move onto the next question.
B) The next question is a tricky one. It takes a lot of practise and be mindful that the example I am using is a simple one for teaching purposes. The question you need to ask yourself next is “where does this move break down?”. Have a look below:
At point (1) above, the low of the move has been identified. The best entry you can get here is at this low. Even though the move goes below our entry briefly (follow the arrow) when they flush the move, we can still prevent being stopped out which I will explain later.
The worst entry here is (2). This is a chaser’s entry. They didn’t wait for price to come to them, instead they saw a couple of green bars and were worried the move was going to get away from them so they bought at the top - this chaser would have been flushed out with the second big red candle.
A satisfactory entry would be right at the Walnut Level (3), but this leaves you prone to being flushed.
So, the answer to our second question “where does the move break down?” is the yellow arrow. Too far below this arrow and the move will be over as buyers wont be interested.
Rule 2: The breakdown point is where we set our entry.
Next question:
C) Okay, so now we have our entry, our attention needs to turn to our exit. And the first thing we always think about is our risk. So our next question is “where does my Stop go?”.
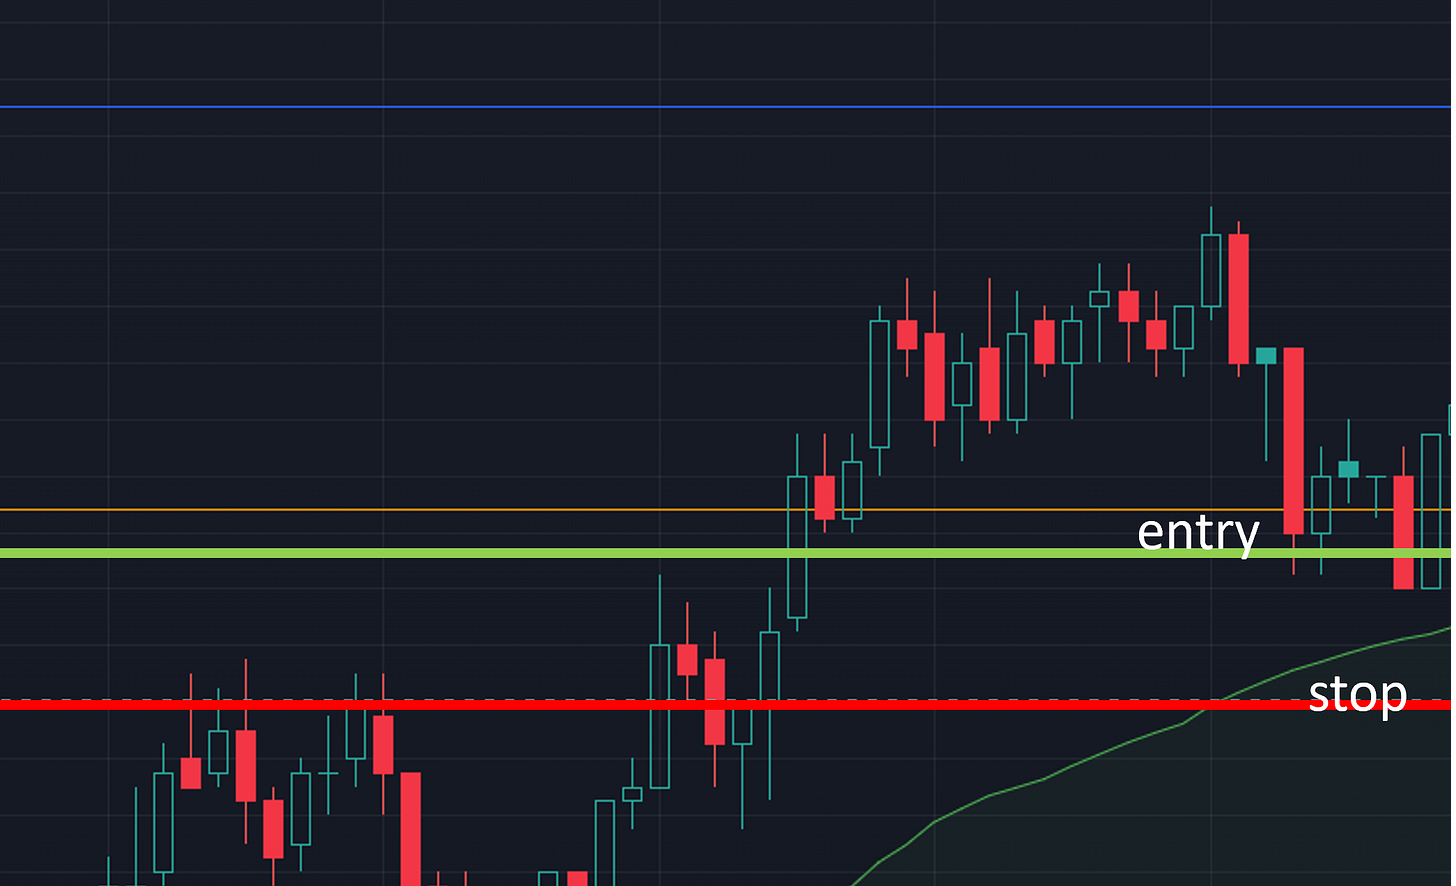
I have a very simple method around stops, some people use structural stops - that is to say, they move their stop around depending on what the setup looks like. This never worked for me, I found myself making huge losses whenever I moved my stop. So I stopped doing it. Now I have a simple rule - my stop is 8 ticks below my entry. So in our current move this is what it looks like:
The green line is our fill position, our stop is 8 ticks below and as you can see it leaves us plenty of breathing space for the move to retest lower.
Rule 3: Define your risk. Have an immovable stop.
Let’s move on.
D) Now that we know our risk, what is our reward? Well, this all depends on your position size. To keep things simple, in this example we will assume that our entry is based on 4 contracts. We will split these into two lots of two.
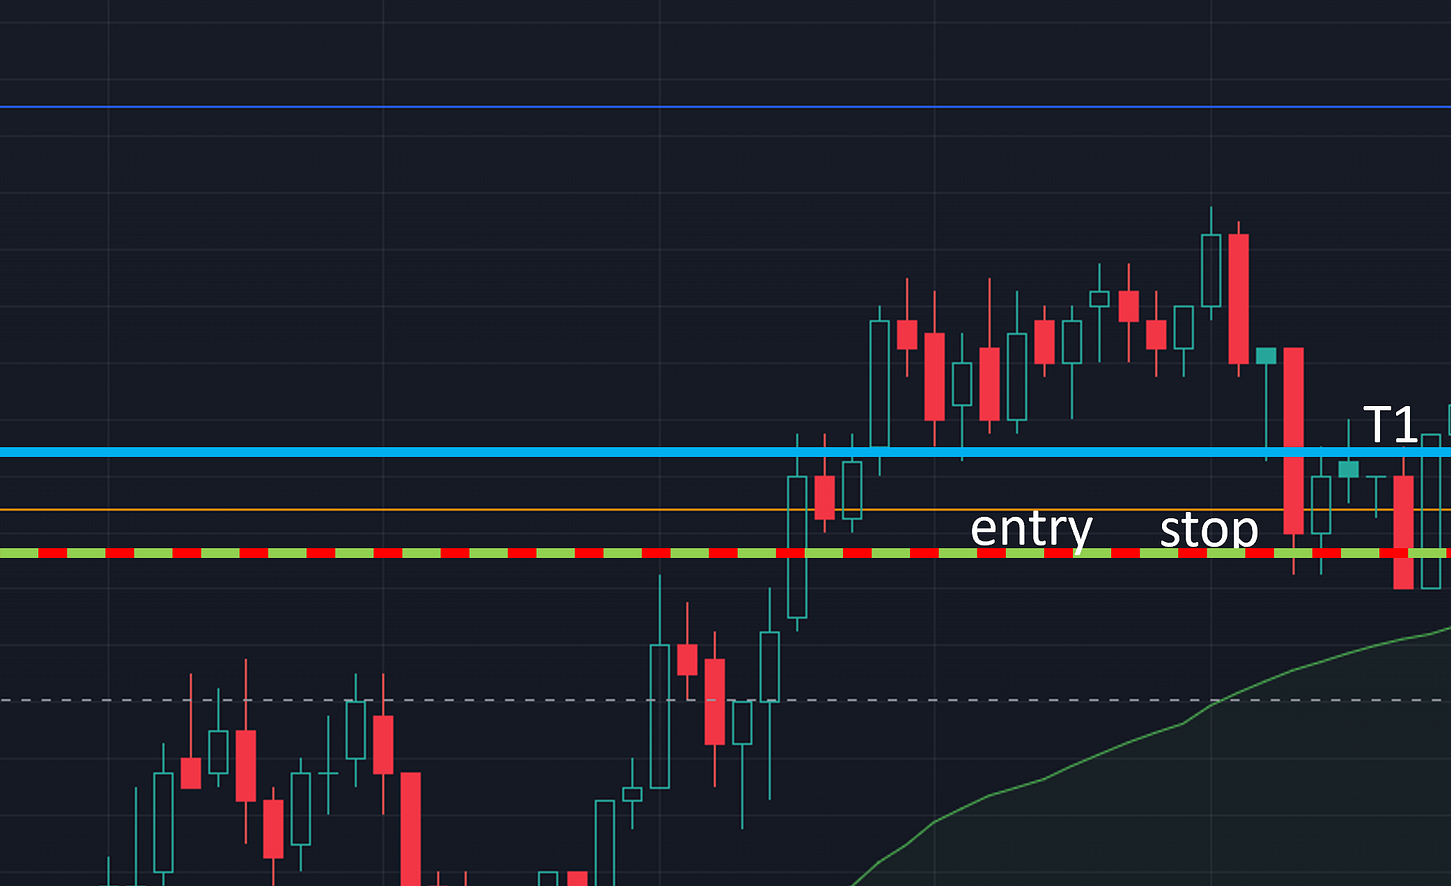
Our first pair of contracts, I would sell 8 ticks up - this is target 1. Importantly, when T1 is hit, we move our stop loss up to break even - we protect our profits at all costs. This means our stop and our target 1 give us a reduced risk ratio. We eliminate the possibility of turning a winner into a loser. On the chart it would look like this:
Our first target, the blue line has been hit by the big green candle, this means that our stop is now at break even matching our entry, the grey dashed line is where our stop used to be. Should the move go against us now, we have locked in minimum profits.
Rule 4: Protect your profits.
Now the fun part, what will our remaining two contract’s target be?
E) Now that we have eliminated risk from our move, we have two contracts remaining to have some fun with. So our natural question is “where do I take my money and run?”.
This answer is the most complicated one, it depends on a lot of variables. How strong is the move up? Is it a trend day? What is the volume telling us? What is the Walnut Footprint showing? But for the sake of this example, I will keep things simple.
The most basic type of target 2 you can have is structural. Let’s look at the chart and see what I mean:
The two arrows above are two structural points where we can sell either 1 or both of the two remaining contracts. The yellow line is the previous high, this intraday level of resistance will likely see some selling activity.
The Walnut-Level-Faithful amongst us might decide to play this move from walnut level to walnut level. In which case, the green arrow would be your exit plan.
Personally, I would sell 1 contract at each point unless this was an aggressive move up in which case I would sell 1 contract at the green arrow and keep a runner by moving the stop up slowly.
Rule 5: Maximise your gains. Sensibly.
So there we have it.
A deep dive into what is going through my mind when I am trying to enter and exit a trade. If I am wrong and the move goes against me, I am allowed to try one more time (but not on the same move).
If the second attempt is also wrong, then I walk away from my screen for the day and try again tomorrow. Let’s summarise our rules:
Rule 1: Only long on a higher low.
Rule 2: The breakdown point is where we set our entry.
Rule 3: Define your risk. Have an immovable stop.
Rule 4: Protect your profits. Move your stop up.
Rule 5: Maximise your gains. Sensibly.
I used to have these rules written down on my desktop background so they were unavoidable. Now, they are second nature. If you use Sierra Charts then you can make this type of bracket order your default setting so it requires less work.
Regardless of how you trade and what your entries/exits are - manging risk and protecting profits is the name of the game but this is all futile unless your entry is good enough in the first place, for this reason Rule 2 is my golden rule.
Please support my work, don’t forget to like and comment below.
Sincerely,
PW.
Apex Prop Trading
I found my consistency using Apex Prop Trading. I wrote about it in detail here.
Click here to find out more and get a 50% lifetime discount.
Walnut Footprints
I explain how to read my footprints here. You can download and use it for free.
I wrote a detailed breakdown of how to sign up for a 14 day free trial of Sierra here.


I started doing 8 tick stop losses to refine my entries
Now after reading this post , nice to know it is tight...but the purpose aligned. Always had a tough time chasing when I first started
8 ticks(2 points)? That is a very tight stop loss. I have watched the markets enough to know your entries would need to be pretty damn perfect for stop that tight,even in ES. Love the content.
AKA: Doc_Holliday